The Binding is the glue that brings the plugin together - Bindings allow MIDI devices to interact with Actions.
Bindings can be used in either Input or Output mode. In Input mode, the Binding will listen for the Message to be fulfilled by the Message’s selected MIDI Device, and upon fulfillment, it will execute all of its Actions. In Output mode, the Binding will listen for the Action to occur (within OBS), and upon occurrence, will send all of its Messages to their selected MIDI devices.
From now on, this guide will refer to the successful occurrence of a Message or Action in a Binding as binding fulfillment. When an input Binding finds that its Message has found an incoming MIDI message that is acceptable to use (as in all conditions are satisfied), the input Binding is said to be fulfilled. The same is true for output Bindings - when an output Binding finds that OBS Studio performed an Action that is acceptable to use (as in all conditions are satisfied), the output Binding is said to be fulfilled.
Binding Creation
Clicking the ![]() button will add a new input Binding with a Message and Action already inside. Double-click the Binding’s name to rename it.
button will add a new input Binding with a Message and Action already inside. Double-click the Binding’s name to rename it.
Clicking the ![]() button will duplicate the selected Binding, and all the Messages and Actions inside with it.
button will duplicate the selected Binding, and all the Messages and Actions inside with it.
Clicking the ![]() button will ask you if you want to delete the selected Binding. If you do, it will be permanently deleted.
button will ask you if you want to delete the selected Binding. If you do, it will be permanently deleted.
Once again, there is no undo button in this plugin - once something is deleted, it cannot be recovered!
Binding Order
Bindings placed higher in the selection list will have higher priority when executing (i.e. the first Binding in the list will be dealt with before the second one). You can drag and drop Bindings to change their order.
This also applies to the Messages or Actions within the Binding. Messages placed higher in order will be sent to their MIDI device first, and Actions placed higher in order will be performed first.
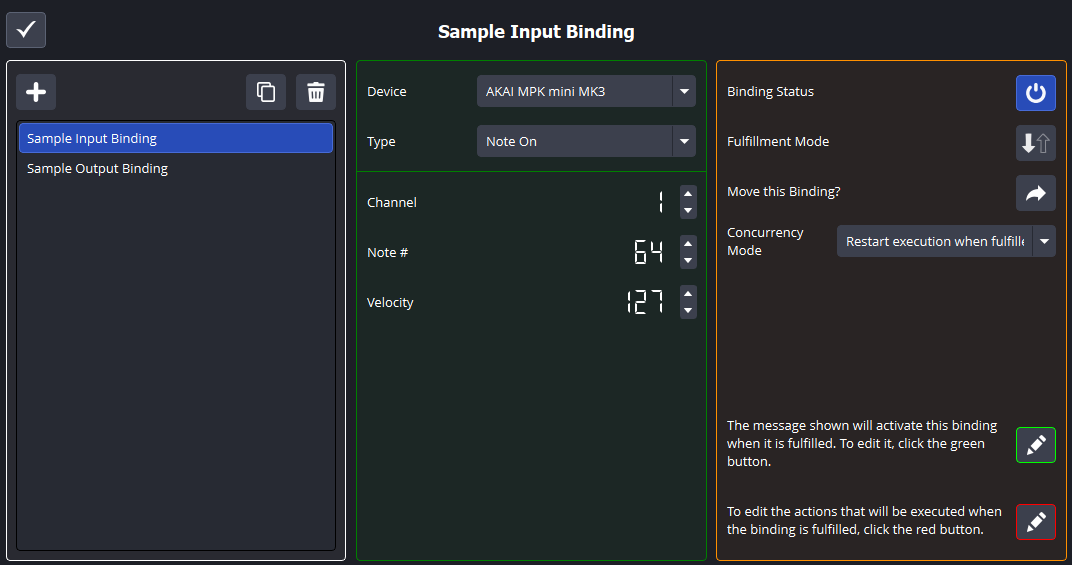
Binding Properties
The middle panel displays the conditions that must be true for the Binding to be fulfilled. In input mode, this will be a Message, and in output mode, this will be an Action. You cannot edit this panel from the Binding editor screen - you must enter the associated editor screen to edit it.
Clicking the ![]() button will enable or disable the Binding. When a Binding is disabled, it completely removes its contents from any MIDI Device queue or OBS Studio queue until it is enabled again.
button will enable or disable the Binding. When a Binding is disabled, it completely removes its contents from any MIDI Device queue or OBS Studio queue until it is enabled again.
Clicking the ![]() or
or ![]() buttons will change the fulfillment mode of the Binding. If the Binding was an input Binding (a Message will trigger Action(s)), it will become an output Binding (an Action will send Message(s)), and vice versa.
buttons will change the fulfillment mode of the Binding. If the Binding was an input Binding (a Message will trigger Action(s)), it will become an output Binding (an Action will send Message(s)), and vice versa. ![]() (a solid down arrow) indicates the Binding is currently an input Binding, and
(a solid down arrow) indicates the Binding is currently an input Binding, and ![]() (a solid up arrow) indicates the Binding is currently an output Binding.
(a solid up arrow) indicates the Binding is currently an output Binding.
All existing Binding data is deleted when its fulfillment mode is changed!
Clicking the ![]() button will ask you what Binding Collection to move the selected Binding to. Once that Binding Collection has been selected, the Binding will be placed there.
button will ask you what Binding Collection to move the selected Binding to. Once that Binding Collection has been selected, the Binding will be placed there.
Concurrency Mode
The Concurrency Mode option indicates what will happen if the Binding is fulfilled again while it is still executing. By default, Bindings will run in Restart execution when fulfilled repeatedly mode - meaning the Binding that is still executing will stop and start over from the beginning. This is useful in most situations where Binding fulfillment may overlap occasionally or the Binding only has one Message or Action to execute.
Bindings can also run in Concurrent execution when fulfilled repeatedly mode, which means the Binding that is still executing will continue to run while the newly fulfilled version of the Binding begins executing. This is useful for situations where the entire Binding must execute every single time, no matter if the Binding is fulfilled again. This is not recommended for most setups, but the option is available.
Binding Contents
Clicking the green ![]() button will enter the Message editor screen. All Message(s) in the selected Binding will be displayed for editing.
button will enter the Message editor screen. All Message(s) in the selected Binding will be displayed for editing.
Clicking the red ![]() button will enter the Action editor screen. All Action(s) in the selected Binding will be displayed for editing.
button will enter the Action editor screen. All Action(s) in the selected Binding will be displayed for editing.
Finally, clicking the ![]() button in the top left will return the plugin to the main menu. This will NOT permanently save your changes - only closing the plugin will do that!
button in the top left will return the plugin to the main menu. This will NOT permanently save your changes - only closing the plugin will do that!